Summary
Looking for an easy way to record your computer screen? Check out our guide to the best methods for capturing high-quality video and audio on your PC and get started.
Introduction
Do you wish to record a lecture, music video or any clip for later use? You can easily record the screen to save the clip. Whether you’re using Mac or Windows, there are in-built tools and easy steps to help you record your screen.
These methods include both screen capture and screencasting. To guarantee that you get the best possible outcomes, we will guide you through the procedures of each approach and provide illuminating pointers. Let’s get started if you are prepared to begin recording what you see on your screen.
Alt: Easy Ways to Record Screen on Computer

Part 1. What is Screen Recording?
“screen recording” refers to filming and recording actions on a computer’s display. It allows you to record software demonstrations, lessons, video conversations, and other stuff to share with others. Recording the contents of your screen may be accomplished using a wide range of applications and methods, including those that come pre-installed on your computer’s operating system and screen recording apps for PC.
The recording of your screen may be beneficial for several applications, including creating instructional films, recording online meetings or presentations, storing streaming material, and creating content for social media or other online platforms. You can produce high-quality recordings that successfully convey your message to your audience if you have the appropriate tools and methods.
Part 2. Does Your Computer Have Screen Recording?
Most current computers have built-in functionality that allows you to record your screen. The Game Bar feature in Windows 10 is one such example since it enables you to record your screen and audio while playing a game. Likewise, macOS comes with a program called QuickTime Player that lets you record your computer’s audio and screen activity. Launch the relevant program and follow the on-screen prompts to start a screen recording with one of these built-in tools. You can usually decide what part of the screen you wish to record, and you may add your voice or other sounds if you want.
While having a screen recording tool already integrated into your operating system is helpful, you may find that it lacks the flexibility and robustness of dedicated third-party applications. If you require more sophisticated capabilities or higher-quality recordings, specialized screen recording software may be worth looking into.
Part 3. How to Record Screen on Computer?
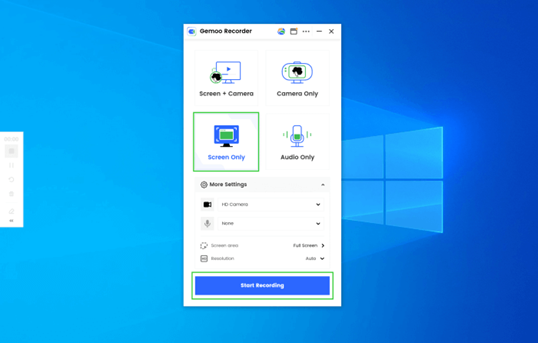
Recording screen on computer is easy as long as you choose the right toolkit – Gemoo Recorder. As a professional screen recording software, Gemoo Recorder works well on both your Windows and Mac computer, recording and saving videos easily & quickly. As you can upload and store your recordings to the cloud, you can share your recording materials with your friends with simple clicks. Now, you can try Gemoo Recorder and take the following steps to record screen on your computer.
Step 1. Free install Gemoo Recorder and launch it on your computer. Click on the Screen Only mode and click on the Start Recording button to initiate the process.
Step 2. After a 3-second countdown, it will start to record your screen.
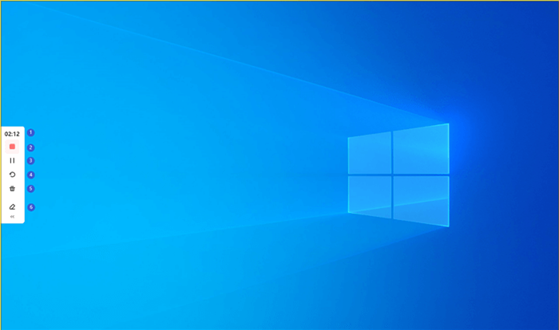
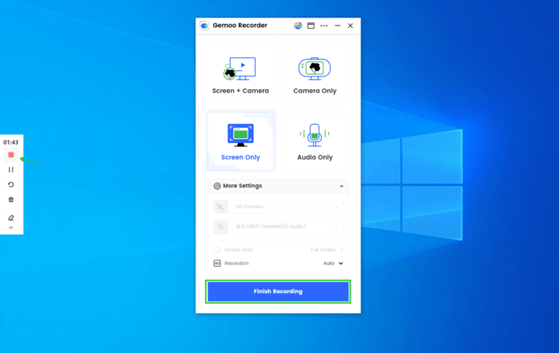
Step 3. When you finish recording, tap on the Red Stop button on the left tool bar.
Part 4. How to Record Screen on Windows?
Utilizing the Game Bar is the primary means to record your screen on a Windows computer. The Game Bar is an in-built feature in Windows 10 that allows you to record both your screen and the audio from your computer with very no configuration required. Follow the steps below:
Step 1: Open the Game Bar by pressing the Windows key plus the letter G.
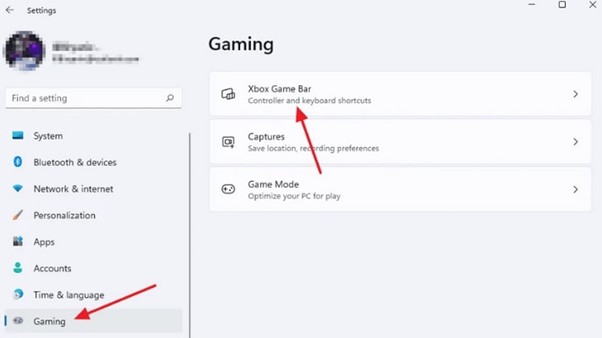
Alt: Open the Xbox Game Bar
Step 2: Click the option labeled “Start recording.” The Game Bar will start recording both your device’s audio and screen.
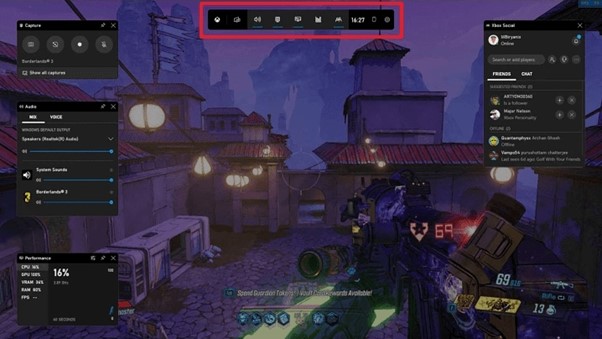
Alt: Start Recording The Game Screen
Step 3: To end the recording, use the Windows key in combination with the Alt key and the R key.
Step 4: The recording you make will be stored in the “Videos” folder in your computer’s “Documents” folder.
Note: Because the Game Bar was developed expressly for recording gameplay, it is possible that it will not be compatible with certain programs. If you cannot record your screen using the Game Bar, you will likely need to experiment with an alternative approach or use software that is not included in the game.
Part 5. How to Record Screen on Mac?
Utilizing QuickTime Player is one of how you may record your screen using a Mac. You may record your screen and the audio being played on it with the help of QuickTime Player, a program that comes pre-installed on macOS computers. Here’re some steps you can follow!
Step 1: Launch QuickTime Player by navigating your computer’s “Applications” folder.
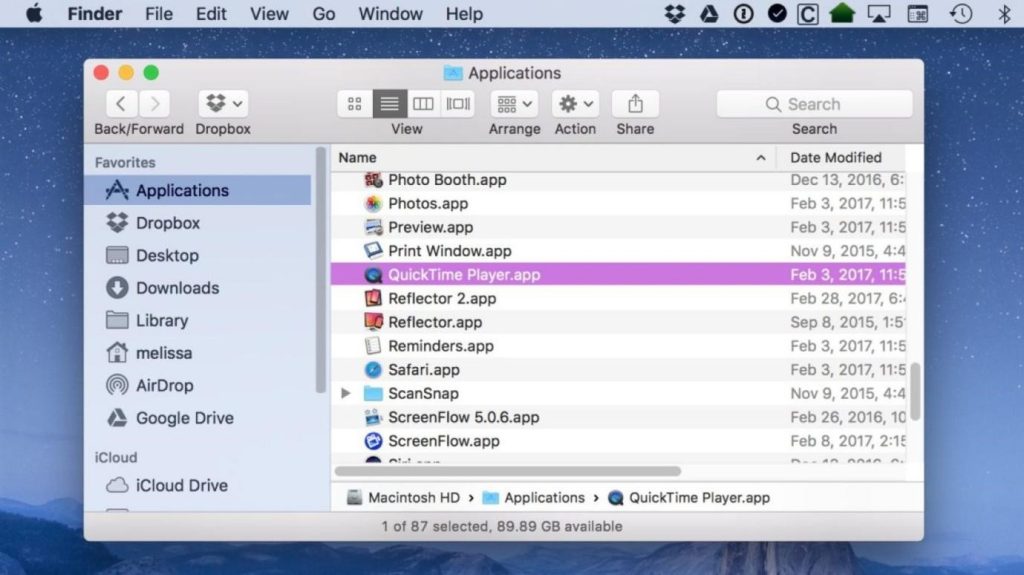
Alt: Launch QuickTime Player
Step 2: To begin a new screen recording, go to the “File” drop-down option in the top menu bar.
Step 3: A popup will allow you to record your screen appearance. Start recording your screen and audio by clicking the red record button when you’re ready.
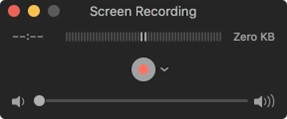
Alt: Click The Red Button To Record Screen
Step 4: Stop the recording by selecting the stop option from the menu bar or pressing the Command + Control + Esc keys simultaneously.
Step 5: Your recording will be stored on your desktop as a QuickTime movie file after completing it.
It is important to note that QuickTime Player allows you to record either the full screen or a certain section of it. Click the arrow next to the record button, and then pick “Selection” from the drop-down menu that appears. After that, you may select the region you wish to record by clicking and dragging the mouse.
Final Thought
Finally, whether you’re using a Mac or Windows, there are several simple methods for recording your screen. Built-in applications, such as the Game Bar on Windows and QuickTime Player on Mac, can record the screen in its most fundamental form. Screen recording is a helpful tool that you can use to capture video and audio of the activities that you are taking on your computer and share it with other people.
This is true regardless of the technique you choose to utilize. Screen recording is a helpful tool that may assist you in efficiently completing various tasks, including creating a lesson, recording a video chat, or simply saving anything that appears on your computer screen.