The proliferation of productivity apps has enabled university students across the globe to optimize their educational experience. With smartphones being ubiquitous, a new approach to studying has emerged – recording lectures for future reference. In fact, a majority of students prefer using lecture recordings as a supplement to classroom instruction rather than relying solely on live lectures. In this article, we’ll introduce 3 ways to record lectures on your Win or Mac computers.
How Should I Prepare for Recording Lectures?
- Make sure you have a clear understanding of the material you will be presenting.
- Test your equipment and software before the lecture to ensure everything is working properly.
- Consider creating a script or outline to help you stay on track during the recording.
- Think about how to share your recordings if needed.
Record Lectures on Computer via Gemoo Recorder
Gemoo Recorder is a must-have tool for teachers and trainers who want to create self-introduction videos, capture their engaging classes, or record online courses. This powerful screen recording software offers a wide range of recording features.
With Gemoo Recorder, you can add annotations, highlight important points, insert text descriptions, and even include emoticons while recording. Once you’re done, you can easily share your recording with others using a short link and receive feedback through comments.
Download and install Gemoo Recorder on your computer now and connect an external microphone to your computer if necessary. And then follow the instructions below to record lectures on your computer.

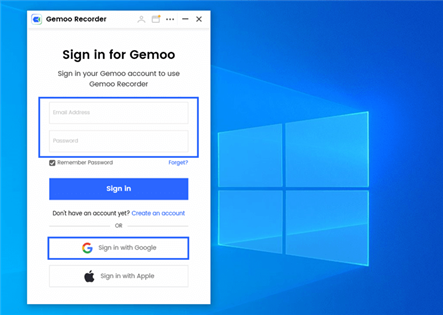
Step 1. Open Gemoo Recorder and sign in to your account.
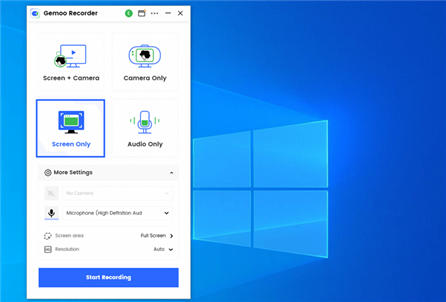
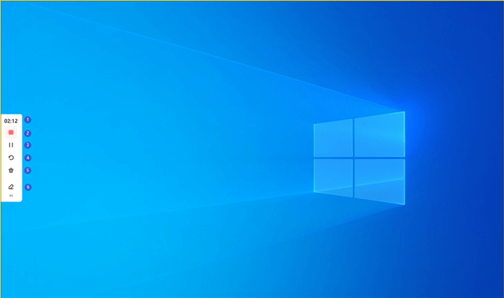
Step 2. Choose the “Screen Only” option, so you can record your lectures with screen and audio. When you’re prepared, you can tap on the Start Recording button to get started.
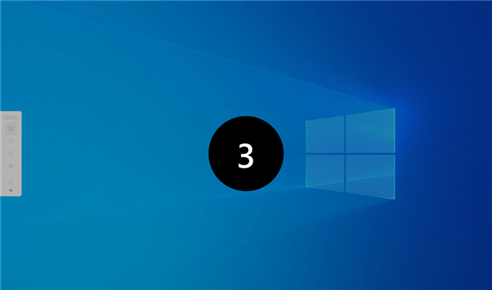
Step 3. After 3 seconds, the recording will begin.
Step 4. When you finish recording, you can tap on the Red Stop button on the left tool bar.
Record Lectures on Windows via Voice Recorder
Voice Recorder is a built-in app that comes with many Windows operating systems, including Windows 10. As the name suggests, it is an app that allows users to record audio using their computer’s built-in microphone or an external microphone.
The Voice Recorder app is simple and easy to use. When you open the app, you will see a large round button with a microphone icon. To start recording, simply click on the button, and the app will begin capturing audio. As you record, you can see the audio levels and the duration of the recording on the screen.
To use this app to record lectures on Windows computer, please follow these steps:
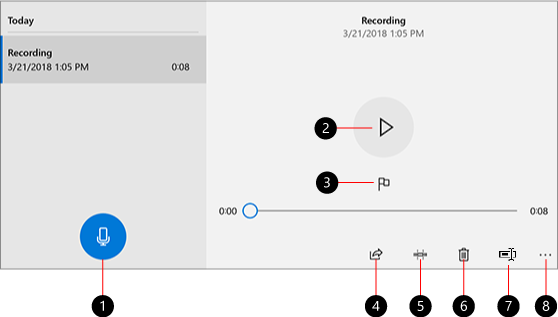
Step 1. Click on the Start menu and search for “Voice Recorder.”
Step 2. Open the app and click on the record button to start recording.
Step 3. Place your computer’s microphone in a location that is close to the speaker to ensure that the audio is clear.
Step 4. When the lecture is over, click on the stop button to end the recording.
The recording will be saved automatically in the app, and you can listen to it later.
Record Lectures on Mac via GarageBand
GarageBand is a free digital audio workstation (DAW) software developed by Apple for macOS and iOS devices. It is a powerful music creation tool that allows users to create and record lectures using virtual instruments, live instruments, and audio recordings.

To use this app to record a lecture, follow these steps:
Step 1. Open GarageBand from the Applications folder or by searching for it in Spotlight.
Step 2. Select “New Project” and choose “Voice” as the project type.
Step 3. Click on the record button (red circle) to start recording.
Tips.
- Place your Mac’s microphone in a location that is close to the speaker to ensure that the audio is clear.
- When the lecture is over, click on the stop button (black square) to end the recording. And then you can save the recording to your computer and listen to it later.
What Are the Benefits of Recording Lectures?
Here are some advantages of recording lectures.
- Felexibility: One of the most significant benefits of recording lectures is the flexibility it provides. Students can watch the lectures at their own pace and at a time that is convenient for them. This is especially helpful for students who have other commitments such as work or family responsibilities.
- Improved Learning: Recording lectures can also improve the learning experience for students. Students can re-watch lectures to reinforce their understanding of the material. This is especially helpful for students who may have missed something during the lecture or who need to review the material before an exam.
- Accessibility: Recording lectures also makes education more accessible to students who may have disabilities or who may not be able to attend class in person. Students who are deaf or hard of hearing can benefit from recorded lectures that include captions or transcripts. Additionally, students who are unable to attend class due to illness or other reasons can still keep up with the course material.
- Increased Engagement: Recording lectures can also increase student engagement. Professors can use technology to create interactive lectures that include quizzes, polls, and other activities. This can help keep students engaged and focused on the material.
Final Thoughts
By following these methods, you can easily record lectures on your computer. Make sure to test your recording equipment beforehand to ensure that the audio is clear and audible. Additionally, be sure to check with your instructor to make sure that recording lectures is allowed in your class.