Building your garden deck is a great way to add some extra living space to your home, while also enjoying the outdoors and improving your landscape. The process of building a deck can be daunting, but if you follow some simple steps you can easily end up with a beautiful and functional garden deck. In this article, we will cover each of those steps in detail, so that you can build your deck with confidence and ease. Whether you’re an experienced handyman or a complete novice, this comprehensive guide will show you everything you need to know to build your garden deck, from start to finish.
Planning and Preparation
Any successful project, whether it be building a deck or starting a business, requires careful planning and preparation. This is especially true when it comes to deck construction, which can be a complex process if not done correctly. By taking the time to plan your deck builds carefully, you can avoid many potential problems and ensure that your finished product is something you can be proud of.
First, plan what you want your deck to look like. Decide on the size, shape, and design of your deck before starting construction. This will save you a lot of time and hassle later on. Second, check for underground utilities. Make sure there are no gas or electric lines buried where you plan to build your deck – it would be very dangerous to dig into them! Also, depending on where you live, you may need a permit to build a deck – check with your local building department to find out.
You should also order materials in advance if possible. This will prevent delays later on in the project caused by waiting for materials to arrive. Finally, make sure you have all the necessary tools and equipment before beginning construction. This will save you time and frustration later on.

Choose Your Materials
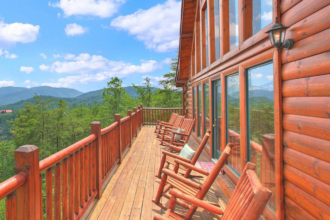
The type of materials you use for your deck will have a big impact on its overall look and feel. There are many different options available, from traditional wood to more modern composite decking for your garden that will stand the test of time. Choose the material that best suits your needs and budget, keeping in mind that different materials require different levels of maintenance.
If you’re on a tight budget, lumber is the most affordable option. Treated lumber is the best choice for outdoor projects like decks, as it is resistant to rot and insect damage. However, treated lumber can be difficult to work with and may require special tools or equipment. If you’re not comfortable working with treated lumber, there are other options available that may be more suitable.
Composite materials are another popular choice for decks, as they are easy to work with and require little maintenance. Composite decks are made from a mixture of wood fibers and plastic, which makes them very durable and weather-resistant. However, composite materials can be more expensive than traditional lumber.
Excavation and Footing
After planning and preparing for your deck build, the next step is to start excavating. This is where things can get a bit tricky – depending on the design of your deck, you may need to dig deep footings or install piers to support the weight of your deck. Be sure to consult with a professional if you are unsure about how deep to dig or what type of footing to use.
Once you have excavated the area for your deck, it’s time to start building the footings. The most important part of any foundation is making sure it is level. Use a laser level or transit to check for levelness as you go. Also, be sure to tamp the soil around the footings to compact it and prevent settling. If you’re using concrete footings, be sure to follow the manufacturer’s instructions for proper mixing and pouring.
Framing
After the footings have cured, it’s time to start framing your deck. This is the most important part of the project, as it will determine the overall stability and strength of your deck. Be sure to use only pressure-treated lumber for all framing members that will be in contact with the ground.
When installing the joists, be sure to space them evenly at 16″ in the center. Use hangers or brackets to secure the joists to the beams. Also, make sure all joints are properly secured with galvanized nails or screws. If you’re using a ledger board to attach your deck to your house, be sure to use lag bolts or through-bolts that are long enough to penetrate the sheathing and reach the wall studs.
Decking
After the framing is complete, it’s time to start installing the decking. This is the part of the project where you get to see your vision come to life! Begin by attaching the deck boards to the joists with galvanized nails or screws. Be sure to leave a 1/4″ gap between each board to allow for expansion. If you’re using composite materials, you may not need to use fasteners at all – some brands can be installed using a special clip system.
Once all the deck boards are in place, trim any excess material from the ends. If you’re using pressure-treated lumber, be sure to seal the ends with a waterproofing sealant to prevent rot. You may also want to finish your deck with a stain or sealer to protect it from the elements and extend its life.
Finishing Touches and Maintenance
After your deck is complete, it’s time to add the finishing touches. This might include installing a railing or benches or adding some landscaping around the perimeter. Be sure to consult your local building codes for any required safety features such as railings.

Once your deck is finished, it’s important to maintain it properly to prevent weather damage and extend its lifespan. Be sure to sweep it regularly to remove debris, and wash it with a mild soap and water solution at least once a year. You may also want to apply a sealer or stain every few years to protect the wood from the elements. And, of course, be sure to inspect it regularly for any signs of damage or instability.
Even though building a deck can be a daunting task, with proper planning and execution, it can be a fun and rewarding experience. By following these simple steps, you can build a beautiful and functional deck that will add value to your home and provide years of enjoyment. And if you are unsure about any part of the process, be sure to consult with a professional and get expert advice.