Are you feeling helpless because of having damaged photos that you can’t use or share with others? Do you wish you could fix these pictures like a professional? If so, you’re in the right place! This guide will teach you how to fix a damaged photo effortlessly and you will realize that it is possible and easy to repair damaged photos.
Photos are more than just images.They capture important moments, like weddings or graduations and they are also a way to document our family history and tell stories about our ancestors. We risk losing these precious memories forever when these photos are damaged , whether due to natural wear and tear or accidental damage.
But don’t worry, in this article, we will explore different methods for repairing damaged photos like a pro. We’ll cover manual techniques and discuss photo repair software options to help you quickly and easily fix your photos.
By the end of this article, you’ll have a clear understanding of how to repair damaged photos and transform them into beautiful, restored images.

Part 1: Can Damaged Photos Be Repaired?
It’s disheartening when we discover that our treasured photo files have been corrupted due to various reasons like scratches on DVDs, bad sectors on storage media, or data degradation. Therefore, users frequently ask a question on social meida or online query platforms: “Can damaged photos be repaired?”
YES!! it is possible to repair damaged photos using the right software solutions. With advancements in technology, there are numerous software solutions available.
Before you start thinking about solutions to fix those damaged or corrupted photos, let’s take a moment to understand what caused the issue in the first place.
Part 2: Common Causes of Damaged Photos
Do you know what causes these photo files to become corrupted? “Here are some reasons why your photo files may become corrupted:
- Hardware issue:Hard disk problems or crashed computers can lead to corrupt photos, leaving you with no choice but to find a solution.
- Unexpected situation:Unexpected shutdowns during the saving process can be a major culprit behind corrupt photos. It’s important to keep your computer up to date and maintain it well to prevent such occurrences.
- File format incompatibility:File format incompatibility can cause photos to be unreadable or distorted. It’s important to ensure that the file format is compatible with the device you’re using.
- Virus attack:Malware and viruses are common computer threats and can wreak havoc on your photos. It’s essential to be vigilant and scan your device regularly using reliable antivirus software.
Knowing these reasons can help you take preventative measures and apply the relevant fixes when any problem arises.
So we’ve uncovered the reasons behind the damaged photo. Let’s keep reading for the next steps and discover how to fix a damaged photo.
Part 3: How to Fix a Damaged Photo?
Are you tired of looking at your precious memories in a distorted, blurry, or pixelated form? Don’t let damaged photo ruin your mood anymore!
We’re exploring 4 ways for you to recover your damaged photos in this article. Let’s get started;
Option A: Photo repair software: 4DDiG Photo Repair
Say hello to the ultimate photo repair software – 4DDiG Photo Repair – that beats all other options available in the market with its unmatched performance.
Here are amazing features of 4DDiG Photo Repair Tool:
- Supports various file formats including jpg, jpeg, arw, cr2, erf, nef, pef, raw, etc.
- Retrieve photos that are out of focus, overexposed, or low-resolution.
- Can repair up to 3000 pictures at once.
- Quickly and securely repaired with a 100% guarantee.
- An even higher rate of success compared to similar applications.
This software can easily fix whether your photos are low-resolution, overexposed, or corrupted. You can rest assured that your pictures are in safe hands as the repair process is 100% easy and secure.
Here are the easy steps to follow when using the 4DDiG Photo Repair software to recover your damaged photos:
Step 1:Install and launch this photo repair software
After downloading and launching the photo repair software, you will be presented with a user-friendly interface. To start repairing your photos, select the ‘Photos repair’ option from the menu.

Step 2:Drag and drop your damaged photos onto the screen
Once you have entered the photos repair window, simply drag and drop your cracked, blurry, or distorted photos onto the screen. Selected all the photos you want to repair, click on the ‘Repair’ option to begin the magic.
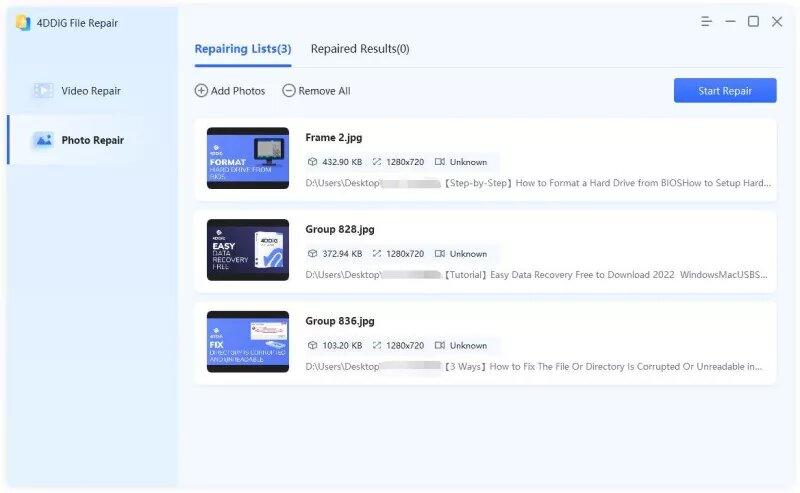
Step 3:repair photos in an eye of bilnk
Once the repair process is complete, you can preview all the repaired photos on your screen. If you’re happy with the results, you can save them on your computer by choosing your preferred location.

That’s it! In just three simple steps, you can bring back to life those precious moments that were once lost due to damaged photos. So, what are you waiting for? Give it a try!
Option B: How to Fix a Damaged Photo with CHKDSK Scan?
If you don’t want to use any photo repair software, then don’t worry, there are a couple of solutions you can try to repair damaged photos on Windows 10.
First of all, we have the trusty CHKDSK scan. This scan is great for fixing any file system errors, but before you dive in, make sure you’ve backed up those corrupted files to an external drive.
Here’s what you need to do:
Step 1:Selet “Command Prompt(Admin)” from “Start”. Alternatively, you can press “Win+Q” and Enter “Command Prompt”. Then, remeber to choose “Run as administrator”.

Step 2:Type in ‘chkdsk /r /f X:’ where X is the drive letter of the connected media.

Step 3:Wait for the scan to finish. By scanning for errors and fixing them, the CHKDSK will eliminate the issue of your damaged photo.
Option C: How to Fix a Damaged Photo by Error Checking Tool?
If CHKDSK Scan doesn’t work, don’t worry, we have another solution for you. You can try using the error-checking tool that’s usually built-in on every Windows computer.
Here are the steps:
Step 1:Find ‘File Explorer’ and right-click on the connected media containing the corrupt photos.
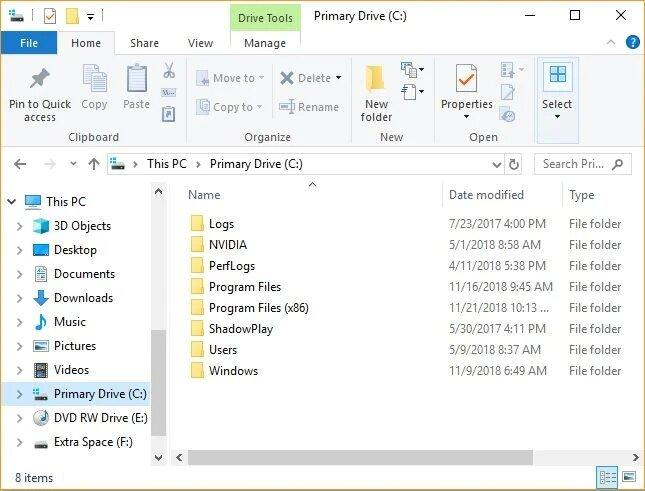
Step 2:Click on the ‘Properties’ button of the drive that includes the corrupted files.

Step 3:Click the ‘Tools’ tab, and then click on the ‘Check’ button.

Step 4:Simply click on the ‘Scan drive’ option and the tool will begin to scan the drive.

Step 5:Once you have clicked on the ‘Scan Drive’ button, all you need to do is wait for the scanning process to complete.

Step 6:If the tool finds any issues, it will list them down for you to resolve. If not, it will notify you with a message in a dialogue box.

Option D: How to Fix a Damaged Photo Using Photoshop?
Note:This method is more suitable for those who are patient and often use photo editing software. In addition, this method is mainly used to repair photos damaged due to aging, not due to damage caused by viruses or hardware failures.
It can be challenging to repair damaged photos by Photoshop, especially if you’re using Photoshop. If you’re up for the challenge, here are the steps to repair old damaged photos using Photoshop:
Step 1:Scan your damaged or old photos
Prior to scanning the photos, ensure that you have removed all dirt and dust particles to the best of your capability, in order to prevent them from appearing in the digital image.

Step 2:Assess the extent of damage and formulate a plan of action
After evaluating the extent of restoration necessary for the image, a plan of action should be devised and the sequence of repairs determined. It is advisable to begin by fixing the overall image before addressing any specific areas of damage, whether it is simply faded or missing torn bits from the picture.
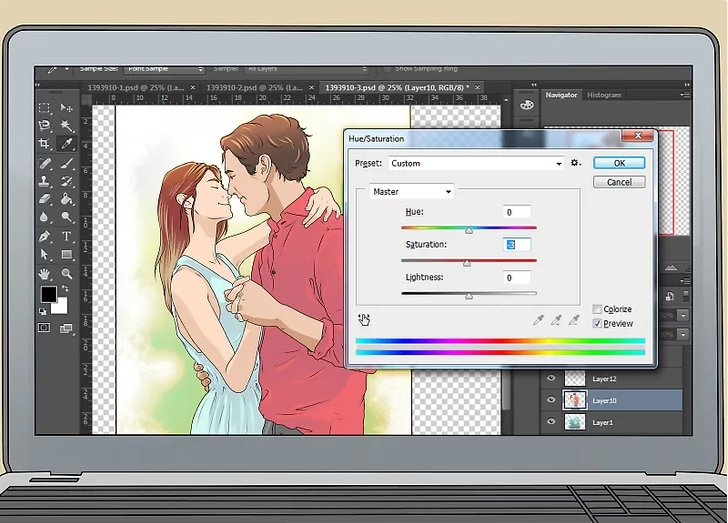
Step 3:Crop the image and Start to use Photoshop
Firstly, crop your photograph for removing unnecessary elements. Secondly, you can use tools inside photoshop to start repairing pictures. For example, you can use auto color, auto-tone, and auto-contrast features to restore faded colors. Addiontally, you can use a noise reduction tool to remove spots and streaks.
Step 4:Print the final result to see how the restoration looks in physical form
Once the photograph has been restored, it can be printed using an inkjet printer or a specialized photo printer equipped with glossy paper.

Part 4:Important Tips for Damaged Photo
Your pictures are priceless memories that you want to cherish forever. So, to prevent any photo disasters, here are some important tips that can help you keep your photos safe and secure:
- Be careful while moving or using files: Interruptions while moving or using files can result in data loss. So, make sure that you do not disturb the process while files are being moved or used.
- Avoid unexpected shutdowns: Unexpected shutdowns can be a real threat to your photos. Therefore, ensure that your device has a sufficient battery or is plugged in a while in use. Additionally, try to avoid using your device in extreme temperatures, as it can cause damage to your hardware.
- Keep your device malware-free: Malware and viruses can corrupt your files and damage your device. So, scan your PC regularly with reliable antivirus software to keep your device safe and secure.
- Backup your files regularly: Backing up your files regularly can save you from losing your precious photos. You can use an external hard drive, cloud storage, or any other backup options available to keep your files safe and secure.
By following these tips, you can keep your photos safe and secure from any damage or loss.
Bonus Tips: Repair Damaged Photos Online for Free
In fact, there are several online tools available that can help you repair damaged photos for free. Some popular choices include Fotor, Pixlri, Piccy or GIMP . You can go to their website to repair damaged photos online for free.
Moreover, if you want to repair more than pictures, 4DDiG File Repair can also help you restore important data such as documents, audios and videos online for free.
However, it’s important to remember that online repairs are far less effective than software due to technical limitations and varying degrees of photo damage. If you have important photos that require extensive restoration, it’s recommended to seek professional assistance.
Conclusion
Dealing with damaged photo is a frustrating experience and it can be a difficult and laborious process to repair damaged photos. However, with the right tools, it doesn’t have to be. We’ve shared some tips and tricks for fixing damaged photos, but if you want to make the process even more efficient and effective, 4DDiG Photo Repair is the perfect photo repair software for you. So, Say goodbye to frustrating and time-consuming photo repair methods and hello to a faster, more efficient solution.